Once upon a time, there was a boy named Khoa who found math as confusing as mud. Especially geometry, the diagrams looked like tangled threads. One day, his grandmother saw him struggling and showed him a way to “see” shapes by making models with his own hands. Following her advice, Khoa started making models. Surprisingly, from then on, Khoa excelled in math, especially in spatial geometry. So, what’s the secret to making 3D geometry models? Let’s explore with “HOC LAM” (Learn How To)!
Are you struggling to find ways to solve geometry problems? Don’t worry, this article will guide you on how to make 3D geometry models, helping you “see” shapes more clearly.
Essential Materials
To begin your journey to conquer spatial geometry, you’ll need to prepare the following “weapons”:
- Cardboard: Choose medium-stiffness cardboard, not too thick or too thin, for easy cutting and shaping.
- Bamboo skewers/toothpicks: To be used as edges of the model.
- Glue: White glue or hot glue are both suitable.
- Scissors, ruler, pencil: Essential tools for measuring and cutting.
- Tape (optional): For reinforcing the model.
Step-by-Step Guide: Building Models
Now, let’s start “sculpting”! Depending on the geometric shape you want to make (cube, pyramid, prism, etc.), you need to draw the faces of the shape on the cardboard. Then, cut along the drawn lines and glue the faces together. Finally, use bamboo skewers/toothpicks as edges and attach them to the vertices of the model.
For example, if you want to make a cube model, you need to cut out 6 equal squares. Then glue these squares together to form a cube. Use bamboo skewers/toothpicks to make the edges of the cube.
Ms. Lan Anh, a Math teacher at Chu Van An High School in Hanoi, shared in her book “Journey to Discover Spatial Geometry”: “Making models yourself will help students visualize the shape and properties of 3D geometric shapes more clearly, thereby mastering knowledge more easily.”
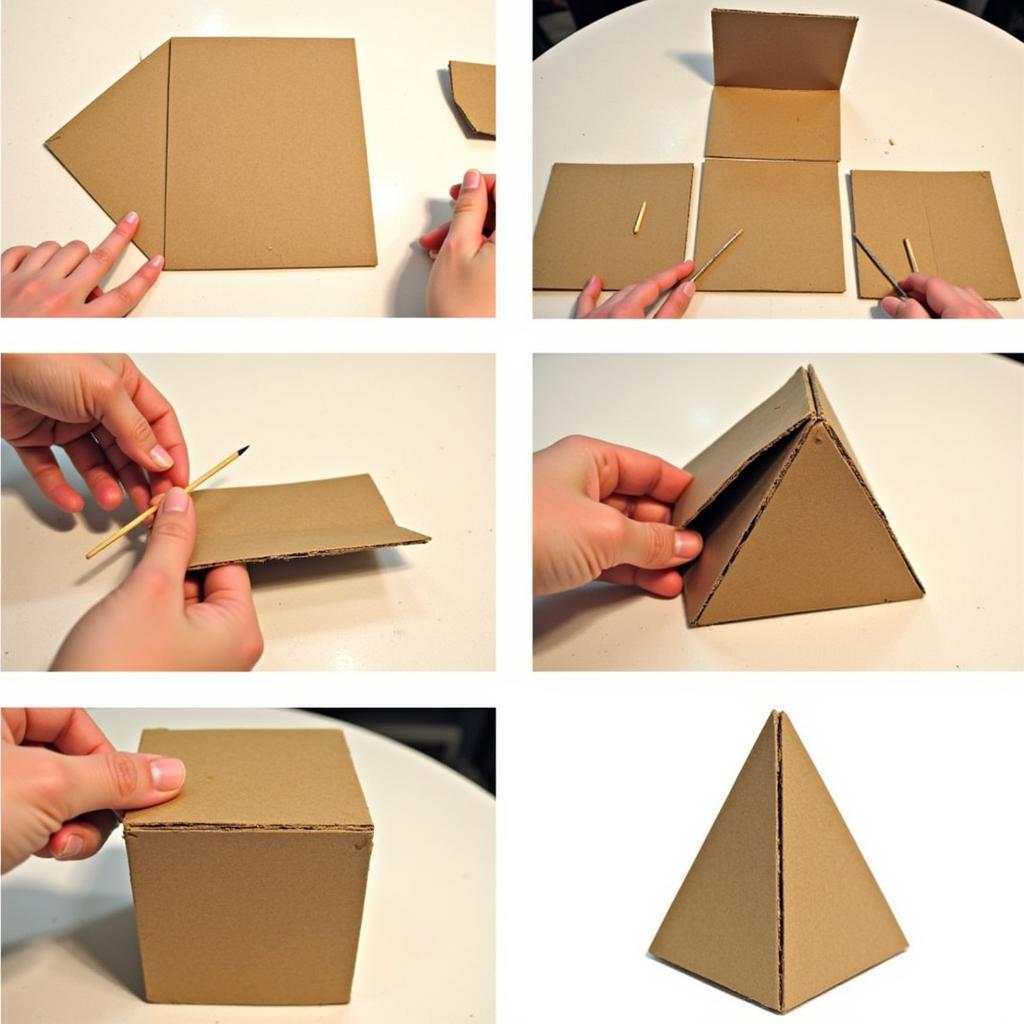 Step-by-step guide on how to construct 3D geometric models from cardboard and skewers
Quick Tips
- Cut the cardboard carefully so that the faces of the model are even.
- Use glue sparingly, avoiding glue smudges.
- You can paint the model to easily distinguish faces and edges. “Little strokes fell great oaks,” don’t underestimate small details!
- For complex shapes, you can search for available templates online.
Are you ready to learn how to be tolerant in love? Or would you like to learn more about how many episodes are there in “Learning to Love”?
Benefits of Model Making
Making 3D geometry models not only helps you learn math better but also trains patience, meticulousness, and spatial reasoning skills. Mr. Nguyen Van Binh, a Math teacher at Le Hong Phong High School for the Gifted in Ho Chi Minh City, once said: “Creating a complete product from simple materials will bring students joy and confidence, sparking a passion for learning.” It’s truly “killing two birds with one stone,” isn’t it?
Conclusion
Hopefully, this article has helped you better understand how to make 3D geometry models. “God helps those who help themselves.” Let’s get started right away! If you have any questions, please leave a comment below or contact Phone Number: 0372888889, or visit address: 335 Nguyen Trai, Thanh Xuan, Hanoi. We have a 24/7 customer care team. Don’t forget to share this article if you find it helpful! You can also refer to how to French kiss with tongue or how to tuck in shirts neatly for male students on our website.